Short List

Installation

Troubleshooting

Features

Order

External ClockCard - Installation

  Hardware Installation

Software Installation


Hardware Installation and Setup


Unpack
Unpack the clock, data cable and power supply.
Locate the ClockWatch ClockCard CD-ROM, which has all the installation files you will need.

Position the Clock
Locate the clock indoors away from computers and monitors.

Plug in the Power Supply
Plug the 120 VAC power supply into the wall and the 2.1 mm connector on the lower edge of the clock.
The green LEDs should light when the clock is powered and the switch is on.

Connect the Clock to Computer
Connect the clock to the computer serial port using the included DB-9 data cable. Note the COM port number used.

   
  Software Installation and Setup
 

Install the ClockCard Software
Insert the CD into the CD drive. The installation wizard will auto-start. On the Welcome window, choose “ClockWatch”. This will open a Version window, from which 
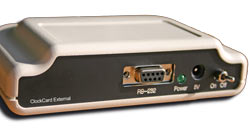
you can choose ClockWatch ClockCard. Choose the "External ClockCard" option.

Install ClockWatch
If installing ClockWatch do so after installing ClockCard. Accept all default options for the installation wizard, and enter the key code located on the back of the envelope when requested.

Configuring ClockCard for the first time
Run the Real Time program. Select Connection and select the serial port in use. Keep the default baud rate and port parameters. Select RTC as the clock to display on the main screen..


Test the Clock in ClockCard
The program will communicate with the clock and show the time on the clock. You can press one of the buttons to set the time the ClockCard or set the PC from the RTC.


ClockCard Main Page


  | Search
Copyright © 2007 Beagle Software. All rights reserved
Last reviewed March 19, 2008