Unpack Unpack
After you unpack the DocuClock
printer, make sure you have these items.
If any item is missing or
damaged, please contact Beagle Software for assistance.
 Remove the Transportation Damper Remove the Transportation Damper
The printer is protected during shipping by a
transportation damper that must be removed
before you turn on the printer.
Pull the damper out and
remove the strip of tape from the top of the printer, as shown below.
 Connect the
DocuClock Printer to the Computer Connect the
DocuClock Printer to the Computer
You need the supplied interface
cable to connect your computer to the DocuClock printer. Instructions for both
interfaces follow. Serial or Parallel: which do I have?
DocuClock Serial Printer
You need the supplied serial interface cable to
connect your computer to the printer.
-
First
make sure that the printer
and the computer are turned off.
-
Plug the cable into the connector on the back of the printer, as shown.
In most cases you can tighten by hand the screws that attach the cable to the
printer.
-
Connect the other end of the
cable to the available serial port connector on your computer.
With the use of a Serial to Ethernet
adapter you can locate the DocuClock printer anywhere a network connection
is available.
DocuClock
Parallel Printer
You need the supplied parallel
interface cable to connect your computer to the printer.
-
First
make sure that the printer
and the computer are turned off.
-
Plug the cable into the connector on the back of the printer, as shown.
-
Connect the other end of the
cable to the available parallel port connector on your computer.
 Connect the Power Supply Connect the Power Supply
The DocuClock printer includes an
external power supply.
Note:
Using an incorrect power supply can cause
serious damage to the printer.
-
First
make sure that the power
supply is turned off.
-
Plug the power supply’s
cable into the printer’s connector as shown below. Note that the flat side of
the connector faces up.
-
Plug the power cord into an
outlet.
 Insert Paper Insert Paper
Note:
Do not
use wrinkled or curled paper.
To insert paper, follow these
steps:
-
Make sure that a ribbon
cassette is installed in the printer.
-
Turn on the printer. The
POWER light comes on.
-
Press the
RELEASE button. The RELEASE light comes on, which indicates
that the printer is in the paper release mode. In this mode, the printer can
accept paper and paper can be removed from it.
-
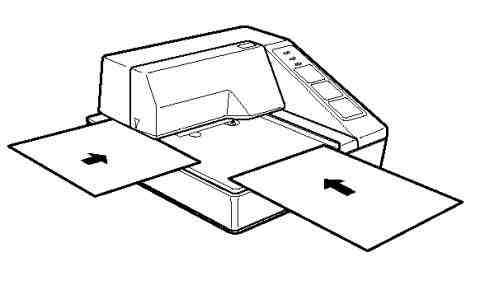
Insert the paper from either
the front or the side, as shown in the illustration below. Insert the paper into
the printer until it is stopped by the form stopper. The markings on the side of
the printer can also be used to judge how far to insert paper.
-
Check the PAPER OUT light. When you insert the
paper correctly, the PAPER OUT light goes out. If the PAPER OUT light is still on, remove the
paper and re-insert it.
 Run the Self Test Run the Self Test
Any time that you want to check
the performance of your printer you can run the self test described below. This
shows whether your printer is working correctly. It is independent of the
DocuClock software.
The self test checks the
control circuits, printer mechanisms, print quality, RAM, ROM version, and DIP
switch settings.
To perform the self test,
follow the steps below:
-
Insert a sheet of paper following the instructions above.
-
Turn
off the printer.
-
While holding down the
RELEASE button, turn the
printer back on.
-
Remove your finger from
the RELEASE button. The printer
prints the current printer settings and then ejects the paper.
-
Press the
RELEASE button to eject the paper
completely and insert new paper to begin the second part of the test.
After the
printer prints a pattern, it prints the following message:
***completed***
The printer
ejects the paper; then enters the normal mode.
 Install the DocuClock Software Install the DocuClock Software
1.
Place the CD-ROM in the drive. Installation will start automatically when
the CD-ROM drive is closed.
2.
Follow the instructions
from the DocuClock installation wizard. Select the package (DocuClock Serial or
DocuClock Parallel) depending on the printer type ordered.
3.
When asked for the printer
port, select the COM port number for a Serial Printer or a LPT port number for a
parallel printer.
 That's it! That's it!
Start the DocuClock program from the Start menu and you're ready to print!
Installation Video
A downloadable version of the DocuClock installation video is
available.
It steps through the setup, installation and operation of DocuClock.
This is a low-resolution version of the video included with the product.
Requires: Windows Media Player
Broadband
Download the Video Now
File Size: 5.1 Meg
Dial-Up
Download the Video Now
File Size: 1.6 Meg
Back to top
DocuClock Main Page
|